
⚠️ Important Firmware Disclaimer – Read Before Updating!
NO, YOU DON’T NEED to update Betaflight!
Over half of our support requests come from failed updates, corrupted firmware, or misconfigured BNFs. Don’t waste flight time fixing what already works — FPV is meant for flying, not flashing.
🧠 1. Newer Doesn’t Always Mean Better
Not every new firmware “flies better.” Many updates make no difference — or worse, break things. Influencers may hype new versions, but unless you know exactly what’s changing, it’s not worth the risk.
⚖️ 2. Think Before You Flash
Each firmware update is a gamble. The classic rule applies: never touch a running system. Chasing the latest version often ends with a bricked drone instead of a better one.
🏭 3. Factory Firmware = Tested & Reliable
Your iFlight BNF drone ships with factory-tested firmware chosen for stability and safety. We don’t control Betaflight development — flashing unsupported versions can cause crashes, loss of control, or damage.
💡 4. If It’s Needed, We’ll Announce It
Official firmware updates or new tunes are always posted in our
👉 Team iFlight Facebook Group.
⚙️ 5. Manual Updates = Your Responsibility
If you decide to flash firmware, back up your configuration first.
You’re fully responsible for any unwanted results — including a non-working drone.
💬 6. Need Help?
If something goes wrong, stay respectful — our team and community are here to help.
Submit a ticket via
👉 iFlight Freshdesk Support
How to connect to the Betaflight Configurator:
First, you need to download the latest Betaflight Configurator and install it on your computer. Windows computers recommended!
https://github.com/betaflight/betaflight-configurator/releases

1. Open up the Betaflight Configurator and connect to the flight controller USB port of your BNF drone. The flight controller is usually sitting at the center, either with sidepanels or without depending on your model. While doing that, please read the sticker applied for your convenience.

Second picture shows the video transmitter in the back of the BNF drone with USB port as well, it's NOT the flight controller. The transmitter in this picture is the DJI O3 Air Unit which can be accessed and updated with DJI Software only.
-
If you have any problems with your drivers connecting to the Betaflight Configurator, please download the ImpulseRC driver fixer while having your flight controller connected to your computer USB port. It will automatically install the correct drivers on your windows machine. If that doesn't help, change your USB cable and avoid USB hubs.
-
How to backup your Firmware Configuration using the Presets tab:
1.) Click on the Presets tab on the left in the Configurator to access the Betaflight official Preset library. This doesn't contain any iFlight Presets by default since we are maintaining and updating our own library.

2.) Click on "Save backup" which will export a file with all settings that are currently applied to your drone. Save that file on a secure place, you might need it some day! Hopefully not today...
Remember that this backup can ONLY be applied to the corresponding Betaflight firmware version. If you're not sure what version you're on, just check the header of the just generated backup file. In this example, the version would be 4.4.1. Going down a bit I also see the board_name IFLIGHT_BLITZ_F722 which represents the flight controller model and name of the firmware target I'd have to flash. More about that later.

-
How to add the iFlight Factory Preset Library:

1.) Click on the Presets tab on the left in the Configurator to access the Betaflight official Preset library. This doesn't contain any iFlight Presets by default since we are maintaining and updating our own library.
2.) Click on "Preset sources" to add our iFlight Preset library. A new small window will pop up.
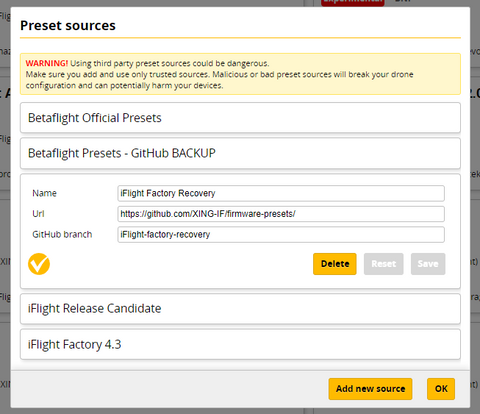
3.) Click on "Add new source" and copy the following text without any backspace (empty space) at the beginning or end of each line.
Name: iFlight
Url: https://github.com/Jason-iFlight/firmware-presets
GitHub branch: iFlight
Click on "Save" and "Make it active" then "OK" to close the window and load the Presets into the Configurator.

4.) Select the Category "BNF". Make sure all other options of the cells Keywords, Authors, Firmwares and Status are empty.

5.) The available factory tunes appear for many different iFlight BNFs. If you can't find your model, please send a ticket on our support page.
https://iflightrc.freshdesk.com/support/home
-
IMPORTANT! Every Preset has a text with "Firmware" and version next to it that MUST be flashed before the Preset can be correctly applied. The firmware version and the preset version have to match. The RC1 in the name is only a marker for "Release Candidate 1" which is our internal way of tracking the preset releases.
-
How to flash the iFlight Factory Default Firmware:
1.) The available preset is made for the latest firmware version that is tested and found reliable from our factory, in this example it's the version 4.3.2. Therefore we have to flash the firmware 4.3.2 before we can apply the preset.

6.) To get to the firmware flash menu just click on "Update Firmware" in the upper right corner.

7.) You're now in the Firmware Flasher screen. Click on "Auto-detect" to automatically detect the correct firmware target for your flight controller. DO NOT TRUST this, but verify if it's correct. As described above, checking your backup file can reveal the correct target firmware.

8.) My BNF drone needs the following setup:
- IFLIGHT_BLITZ_F722 target (confirmed correct)
- 4.3.2 (matches the available factory preset)
- Full chip erase (to make a full wipe)
Everything else can be left at the defaults.

9.) Click on "Load Firmware Online" at the bottom right corner to pull the firmware file from the Betaflight Server. When successful the "Flash Firmware" button turns yellow and you're able to click it.
Attention: If the progress bar gets stuck at STM BOOTLOADER or DFU then you might not yet have the correct DFU drivers installed. Leave your flight controller USB cable plugged in as it is. Use the ImpulseRC driver fixer again to automatically fix your DFU driver issues. Disconnect and reconnect the USB cable and try all over again.

10.) A successful firmware flash will throw a green progress bar at the bottom.

11.) Don't forget to apply custom defaults after a firmware flash! Every flight controller has slightly different firmware settings that needs to be applied after flashing.

Click on "Apply Custom Defaults" to get your flight controller hardware specific configuration. This will NOT restore any BNF drone related settings!
-
How to restore the iFlight Factory Default Preset:
A preset includes a table of settings that are different for every model or version. Every frame, motor, propeller size, weight etc etc needs a certain adaptation of parameters. We've done that for you already!
1.) Once again we go to the Presets tab and select BNF in the Categories dropdown, keep all other keywords empty.
2. We select the model and version of our BNF drone.

3. You read through the Preset description CAREFULLY to avoid any mistakes that could lead to problems with your configuration. Then you click on "Options" to select the self explanatory variant options.

If those options are not self explanatory please go ahead and join our Team iFlight facebook group or our facebook community chat to get excellent help of our pilots there:
https://www.facebook.com/groups/1126000407525570/.
If you need our support then come and send us a ticket on our freshdesk:
https://iflightrc.freshdesk.com/support/home
-
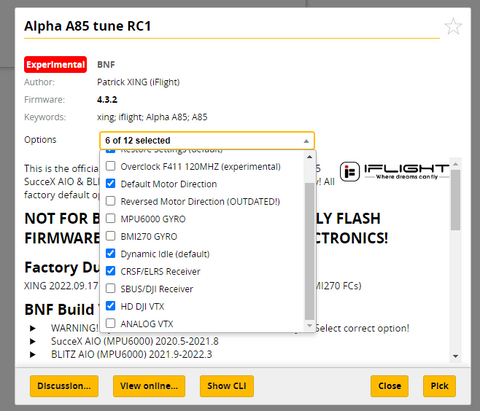
4. In my example, I leave the pre-checked options as it was but select the CRSF/ELRS Receiver and HD DJI VTX additionally to further narrow down the model or variant I bought. Since there is more than one variant available, there's several options. You bought the BNF drone, you should therefore know what you own and what to select.

5. Click on "Pick" to start confirm the preset you just selected. You'll get a warning message and agree to the written text! You are responsible for any modification of your gear, also flashing back and forth different presets! Please remember that!

6. You Click on "Save and Reboot" and the Preset recovery is running through. As soon as it's finished, your BNF drone will be reset to our factory default settings!


